One of the skills I had to master in design school was creating presentation boards. Being neat and meticulous have never been my strongest suits. I was never especially good at creating perfectly straight, perfectly aligned things. And this made presentation boards especially challenging for me. In my brief teaching career I realized that the things that were the most difficult to learn are the things that are the easiest to teach. And that's because rather than grasping them instantly and intuitively, I had to work through them and think through every step. And that was how I learned how to set up my boards.
First of all, I recommend using a large T-square. Use it to line up all the items you will be displaying on your board.
Once you set everything up, take a picture with a digital camera, camera phone, or Polaroid if you have one. This way you will be able to put everything back exactly where you had it before once you apply adhesives to your items.

Speaking of adhesives, I recommend using non-toxic ones. Not only is it better for the environment as a whole, but it is also better for your immediate environment. Indoor air quality is important. A lot of times we artists do not consider our health when creating artwork with hazardous materials, but we should. My first class at design school required creating a mosaic using confetti-sized pieces of Color-Aid paper. We were instructed to use rubber cement. Every time I sat down to work on the mosaic, I got terrible headaches and couldn't concentrate. I had a very hard time finishing the assignment because it was literally making me sick! Eventually I realized the rubber cement was to blame and switched to glue sticks.
But of course, glue sticks can't be used for every item on your presentation board, and that spray adhesive can cause serious health problems if you use it for long periods of time without adequate ventilation. In my case, not having a patio or balcony I can work from at home means I will never have the kind of ventilation needed for adhesives that produce fumes and vapors. But if you use Mod Podge or Elmer's, things can get pretty messy and your papers will wrinkle and warp. So what's a designer to do?
Here are my favorite solutions.
Double-stick tape can be used on lightweight items like fabric, and paper. I recommend printing whatever text you need for your board on cardstock paper, at least 60 pounds. Use the archival tape (often found in the scrapbooking section of art and craft supply stores) to ensure that your boards will stand the test of time for your portfolio.
Mounting tape is great for things like wallpapers, upholstery fabric, vinyl and linoleum tiles, and wood veneers. Another advantage is that because it is made of foam it gives your samples some dimension.
Industrial strength Velcro works wonders with wood, stone, ceramic tile, carpet, and Corian. And a bonus of using Velcro is that you can re-use your samples with other projects. As you see, this dark brown wood flooring worked in both of the projects below.
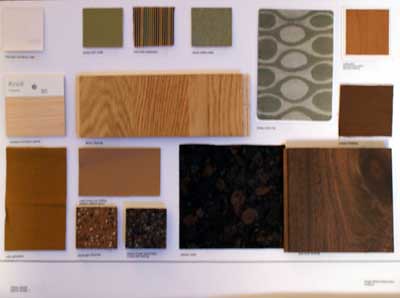
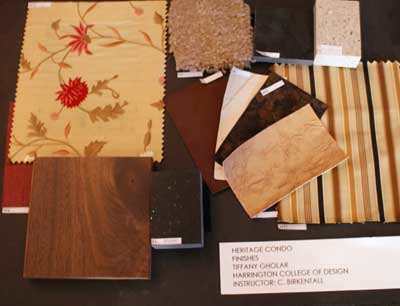
And all I have to do is pull it of one board and put it on the other one. Because let's face it, nice samples of wood, stone, tile, and counter surfacing materials can sometimes be hard to come by, especially when you are still in school.
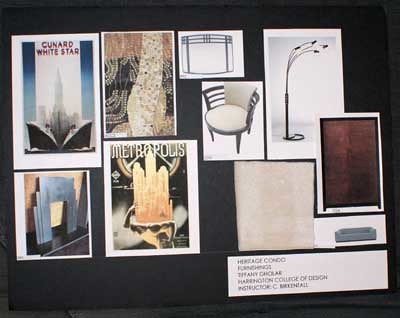
Speaking of that, if you ever end up in a situation where all you can get is a photo of your product, print it on photo paper. Do it yourself or have your local photo lab do it for you. The samples for this board were printed at Walgreen's as wallet-sized photos, and cost me less than $5.00. The glossy finish and the sturdy photo paper they were printed on made it all worthwhile.
So now you have a way to affix all your product samples to the boards without exposing yourself to nasty VOCs. But what about labels? Unless your instructor has specifically told you to hand-letter everything, why not go digital? You can use a hand-held label maker or printable labels on a computer to create neat, consistent labels for your board. (And you can spell-check them, too.)
Finally, if you really want to make a beautiful board, remember that you don't have to do everything yourself. For the board below, I wanted my final rendering to really stand out. I had spent a lot of time on it and didn't want to just stick it on my board with some mounting tape. So I burned it to a CD and took it to Staples to have them professionally mount and laminate it for me. And for about $7.00, it was definitely worth it:
First of all, I recommend using a large T-square. Use it to line up all the items you will be displaying on your board.
Once you set everything up, take a picture with a digital camera, camera phone, or Polaroid if you have one. This way you will be able to put everything back exactly where you had it before once you apply adhesives to your items.
Speaking of adhesives, I recommend using non-toxic ones. Not only is it better for the environment as a whole, but it is also better for your immediate environment. Indoor air quality is important. A lot of times we artists do not consider our health when creating artwork with hazardous materials, but we should. My first class at design school required creating a mosaic using confetti-sized pieces of Color-Aid paper. We were instructed to use rubber cement. Every time I sat down to work on the mosaic, I got terrible headaches and couldn't concentrate. I had a very hard time finishing the assignment because it was literally making me sick! Eventually I realized the rubber cement was to blame and switched to glue sticks.
But of course, glue sticks can't be used for every item on your presentation board, and that spray adhesive can cause serious health problems if you use it for long periods of time without adequate ventilation. In my case, not having a patio or balcony I can work from at home means I will never have the kind of ventilation needed for adhesives that produce fumes and vapors. But if you use Mod Podge or Elmer's, things can get pretty messy and your papers will wrinkle and warp. So what's a designer to do?
Here are my favorite solutions.
Double-stick tape can be used on lightweight items like fabric, and paper. I recommend printing whatever text you need for your board on cardstock paper, at least 60 pounds. Use the archival tape (often found in the scrapbooking section of art and craft supply stores) to ensure that your boards will stand the test of time for your portfolio.
Mounting tape is great for things like wallpapers, upholstery fabric, vinyl and linoleum tiles, and wood veneers. Another advantage is that because it is made of foam it gives your samples some dimension.
Industrial strength Velcro works wonders with wood, stone, ceramic tile, carpet, and Corian. And a bonus of using Velcro is that you can re-use your samples with other projects. As you see, this dark brown wood flooring worked in both of the projects below.
And all I have to do is pull it of one board and put it on the other one. Because let's face it, nice samples of wood, stone, tile, and counter surfacing materials can sometimes be hard to come by, especially when you are still in school.
Speaking of that, if you ever end up in a situation where all you can get is a photo of your product, print it on photo paper. Do it yourself or have your local photo lab do it for you. The samples for this board were printed at Walgreen's as wallet-sized photos, and cost me less than $5.00. The glossy finish and the sturdy photo paper they were printed on made it all worthwhile.
So now you have a way to affix all your product samples to the boards without exposing yourself to nasty VOCs. But what about labels? Unless your instructor has specifically told you to hand-letter everything, why not go digital? You can use a hand-held label maker or printable labels on a computer to create neat, consistent labels for your board. (And you can spell-check them, too.)
Finally, if you really want to make a beautiful board, remember that you don't have to do everything yourself. For the board below, I wanted my final rendering to really stand out. I had spent a lot of time on it and didn't want to just stick it on my board with some mounting tape. So I burned it to a CD and took it to Staples to have them professionally mount and laminate it for me. And for about $7.00, it was definitely worth it:

So, just to review, a list of materials you might want to try using for your next presentation board:
- large T-square
- digital camera
- archival double-stick tape
- cardstock printer paper
- mounting tape
- industrial strength Velcro
- label maker or printable labels
And services:
- photo printing (for pictures of furniture, fixtures, and unavailable samples)
- professional mounting and laminating (for plans and renderings)
I hope these tips will help save you time while preserving your health and your sanity and helping you create a board that will get you a good grade if you're in school, or impress your clients!
A great site and a wonderful post. Beauty is in our heart, beauty is everywhere. Feeling good.
ReplyDeletethanks, Jade!
ReplyDeleteinteresting and informative post!
ReplyDeleteThanks so much, Lena. And thank you for the link from your blog! I really appreciate it.
ReplyDeleteYou're most welcome Tiffany:) I will be a frequent visitor to your fabulous blog...
ReplyDeleteThanks for the informative post Tiffany. I was wondering if you might be so kind as to provide me with how to make the presenation board? For example, what type of material is the board made of? What is the typical size? Is it covered with fabric? If so, what type of fabric and how do you fasten it to the board? Or is there a store you can buy these pre-made boards from? Thanks in advance for your help with this.
ReplyDeleteWendy, I'm so sorry I missed responding to your post. Foam core boards or illustration boards are typically used for interior design. You don't have to cover it with any fabric. Art and office supply stores typically sell them.
ReplyDelete